How To install An Agile PrestaShop Module
This guide will help you better understand how to install Agile PrestaShop modules. This guide applies to all modules. Here, we will use Agile Multuiple Seller as an example, please replace the module name with one you are going to install.
PrestaShop has an excellent architecture for providing very strong modular support. New module installation in PrestaShop is very easy, and can usually be accomplished in just a few clicks.
Most Agile modules do not modify PrestaShop files. As a best practice, we do our best to not change or modify any PrestaShop core files. We add new files, and override PrestaShop's core functions in order to implement the new module functions.
Instructions for PrestaShop module installation:
Upload --> Install --> Configure
1. Login to your store's back office.
You must log in as Admin or an "Employee" user with admin permission to install a module.
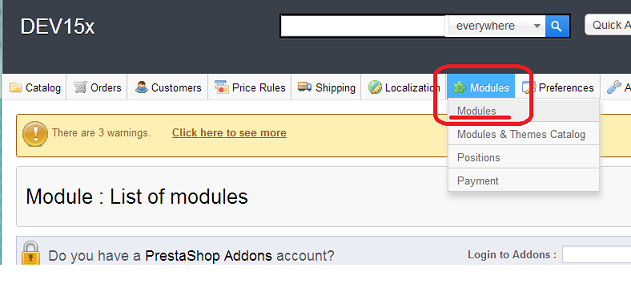
2. Click the "Modules" tab.
After you log in to your store's back office, you will see top row menus and tabs. Please click the "Modules" menu tab, it will bring you to the list of modules (or sections of module categories).

This screenshot is from PrestaShop 1.5x. For PrestaShop 1.4x it will be the same, but there will be no sub-menu - instead, there are sub-tabs.
3. Click "Add new module" to upload the module.
A new module upload form will be displayed on the top of the page, you can browse the files on your local hard drive and choose the module to upload from your local computer (assuming you already have the module package in a zip file). Your module must be in ZIP format when uploaded to PrestaShop.

Choose the correct module package file you want to install. and click "Upload".
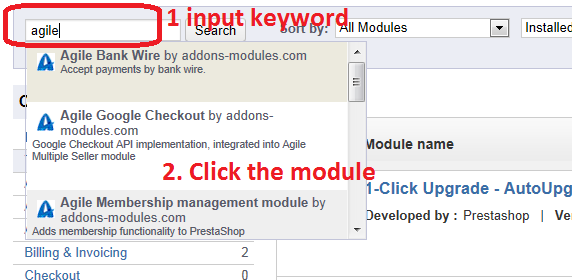
4. Search for the module if not immediately displayed in list:
After uploading the module, now you can install it. If the module is not immediately displayed on the current list of modules, you can search for the module by entering the name of the module in the search box.
For Agile modules, you can simply enter key word "agile", and all Agile modules will be displayed. Then just click the appropriate module.

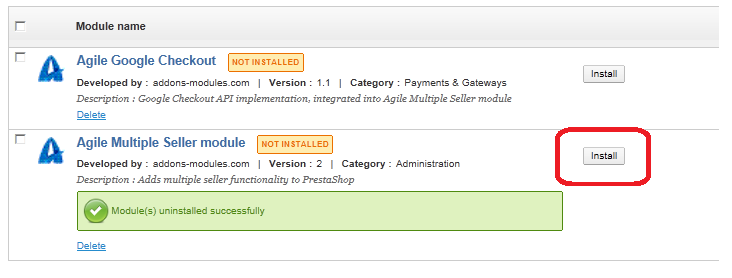
5. Install the module:
The module will be displayed on the page with an "Install" button as shown below. Click the "Install" button, and the module will be installed automatically.

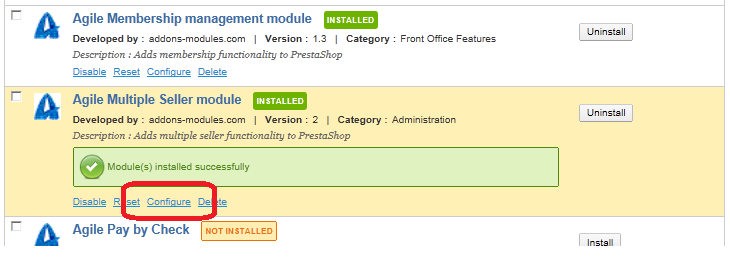
If everything went smoothly, you should see the "Installed successfully" message for that module, and with "Delete", "Disable", "Configure" links under the module name. There will also be an "Uninstall" button on the right side of the module listing, as seen below.

You have now completed the module installation process.
For module configuration, please see the Configuration guide for each module.
